This will be the only “best of” list I have for 2017. Last year I managed lists for metal, electronic music, as well as “other genres”. This year, I have an extra-long metal list, but I did not listen to enough of anything else to make lists, really.
It’s not clear to me what made me exceptionally receptive to extreme music in 2017, virtually to the complete exclusion of everything else. In personal terms, it was a good year. Not much to complain about, and some good progression in the work life has set up 2018 to see some of the logjam of life “to-dos” get un-jammed and moving forward.
In terms of my perspective of the outside world, however, 2017 exceeded my most pessimistic expectations, even as I entered the year rebuking “thank god 2016 is over” sentiments. I recognized worse was to come, but I did not comprehend just how many distasteful, ignorant, and inhospitable things our country had in store. It has been heartbreaking to watch otherwise intelligent people turn off all critical thinking and embrace a world view that is mean-spirited at best, and open hatred at its worst. It is crushing to see people adopt bumper sticker slogans in place of critical thought, and the abject abandonment of intellectual honesty in the name of tribalism.
So, yeah, I guess I can see why I felt an unusually strong need for cathartic release.
Best Metal Album of 2017
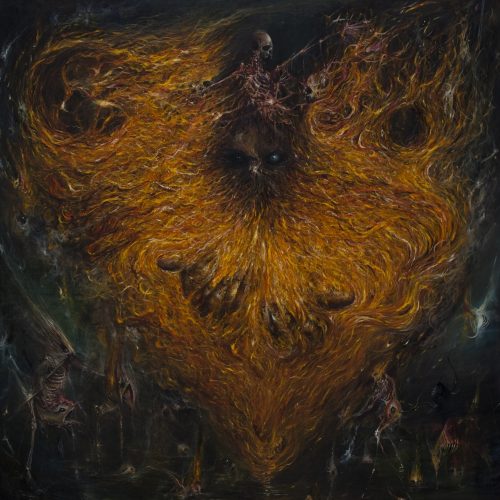
Woe - Hope Attrition
Abject in Defeat
Provided to YouTube by TuneCore
Abject in Defeat · Woe
Hope Attrition
℗ 2017 Vendetta
Released on: 2017-03-17
Auto-generated by YouTube.
No album will symbolize 2017 for me like Hope Attrition. In a year of turmoil, unrest, and disbelief at the breakdown of social and political norms, Hope Attrition brilliantly (and often pointedly and directly) expresses the resentment and disgust at fascism’s crawl out of the shadows.
And it does it with some of the most captivating riffs and melodies I have heard on an extreme metal album, bar none. The bookending tracks, “Unending Call of Woe” and “Abject in Defeat” stand as pillars of the form, and nearly threaten to overshadow the rest of the album. Fortunately, the middle of the album holds its own, particularly “The Ones We Lost” and “Drown Us With Greatness”, the latter clearly inspired by a certain red capped movement.
Chris Grigg’s dynamic vocals are expressive and emotive, and are the element that takes the music beyond just sounding angry and into more complex emotions: frustration, contravention, disbelief, resignation, and defiance. And while Grigg is center stage as vocalist and lead guitar, attention also must be given to drummer Lev Weinstein (of Krallice and so many other bands that, in December, he actually performed a marathon night drumming for 5 different bands, including Woe, called “Levizalooza”.) Weinstein propels the charges forward, then deftly resets the pace in sudden tempo shifts.
Even without the backdrop of the current social landscape, Hope Attrition would be an incredible and impactful album. With it, it’s Album of the Year.
and i relent to power
and i relent to fear
and i relent to every force
that tramples without care
and i regret the meaning
ascribed to every life
the loss compounds completely
abject in defeat
The Rest of the Best
Primitive Man - Caustic
PRIMITIVE MAN - "Commerce" (Official Visualizer Video)
'Caustic' is Out Now on CD/2xLP/CS/Digital
Order via Relapse Records Here: http://bit.ly/PMCaustic
Subscribe to Relapse Records Channel: http://youtube.com/relapserecords
Order on Bandcamp: https://primitivemandoom.bandcamp.com/
Order on iTunes: http://geni.us/CausticiT
Order on Amazon: http://geni.us/CausticAMZ
Order on Google Play: http://geni.us/CausticGP
Denver’s nihilistic trio PRIMITIVE MAN return with Caustic, their second full-length offering of soul-crushing blackened doom and noise-ridden claustrophobia. Recorded and produced at Flatline Audio by Dave Otero (Cobalt, Cephalic Carnage, Cattle Decapitation), Caustic is 12 songs and 75+ minutes of bloodcurdling howls, abysmal tones and dense, unsettling feedback spewing forth a cesspool of utter misery. With lyrical themes ranging from political corruption, personal struggle and the crumbling social climate facing the world today, Caustic serves as a cataclysmic soundtrack for a world gone awry.
Video by Frank Huang (Max Volume Silence)
Official Links:
Primitive Man Official Website: https://primitivemandoom.com/
Primitive Man on Facebook: https://www.facebook.com/primitivemandoom
Primitive Man on Twitter: https://twitter.com/PRIMITIVEMANE
Primitive Man on Instagram: https://www.instagram.com/primitivemandoom/
http://www.relapse.com
http://www.facebook.com/relapserecords
http://www.relapserecords.bandcamp.com
http://www.twitter.com/relapserecords
https://www.instagram.com/relapserecords
Lyrics:
Cold
Shackled to
The bottom
Of the bottle
Of the socio economic slavery
That rules
And runs my life
Combust
Let smoke fill my lungs
Taught lies
Work to ruin
Infected with poverty
Left in the gutter
Over worked
Under paid
From a system meant to fail us
Nothing left
But to hang our hopes out to try
Hell comes home
From the time clock to the death bed
When death grips your hands
And kisses them goodbye
Remember
None of your work days mattered
A lifetime spent tonguing
The asshole of all your superiors
Nothing is real
But the inevitability of your cold fucking death
And your heart being ripped from your chest
Placed into the cavity of another worker bee
Another fucking wage slave
Paycheck to paycheck
Your essence is dead but slavery is forever
Oh Jesus. This album is pure human misery distilled into 75 minutes of music. Caustic is probably the most aptly named album ever. It’s intense and suffocating, and perfectly content to slowly gut-punch you repeatedly over its lengthy run time. It does not offer the kind of artful release from someone like YOB, it does not sound like a tribal force of nature being conjured like Neurosis. It sounds like Hell, like you’ve walked through a door and into a nebulous formless place with incessant, indiscriminate howls, unidentifiable as anything but raw misery.
As a rabid fan of this kind of music, this is one of those sorts of releases that makes me step back and ask myself, “should I be enjoying this so much?” That I find this sort of torturous assault so aesthetically pleasing is disturbing in its own right.
Nothing is real
but the inevitability of your cold fucking death
and your heart being ripped from your chest
placed into the cavity of another worker bee
another fucking wage slave
paycheck to paycheck
your essence is dead but slavery is forever
Celeste - Infidèle(s)
CELESTE - Sombres sont tes déboires (2017) Denovali / Tokyo Jupiter Records
Direct links are provided to purchase 'Infidèle(s)' on CD, vinyl and digital format. Links are also given for Celeste, Denovali and Tokyo Jupiter Records.
"Sombres sont tes déboires" is the fourth song on the album.
'Infidèle(s)' release date - September 29th, 2017.
CD/vinyl/merchandise (Denovali webstore)
https://denovali.com/store/index.php?main_page=advanced_search&s=den286
CD (Tokyo Jupiter Records)
http://jstore.tokyojupiterrecords.com/items/7759266
Digital format (Denovali digital store)
https://www.denovali.com/digitalstore/index.php?main_page=product_info&cPath=999&products_id=3282
Digital format (Celeste/Denovali, Bandcamp)
https://celestes.bandcamp.com/album/infid-le-s
Celeste (Facebook)
https://www.facebook.com/celesteband
Denovali (Homepage)
https://www.denovali.com
Denovali (Facebook)
https://www.facebook.com/denovalirecords
Denovali (YouTube)
https://www.youtube.com/user/denovalirecords
Denovali (SoundCloud)
https://soundcloud.com/denovali
Tokyo Jupiter Records (Homepage)
http://tokyojupiterrecords.com
Tokyo Jupiter Records (Facebook)
https://www.facebook.com/tokyojupiter
Promotional purposes sanctioned by Denovali.
I didn’t discover Celeste until earlier this year, and their (at the time) most recent album, 2013’s Animale(s), would be my Album of the Year if it had released in 2017. So, since I did not put Infidèle(s) as Album of the Year, does that mean I think it’s a lesser album? I don’t think I do believe that. Rather, I think my ranking is more a function of hearing this after having absorbed two very similar albums in the months prior (Animale(s) as well as 2010’s Morte(s) Née(s)).
“Similar” is an appropriate word, because Celeste is not a band with a huge amount of range. They are, however, distinct, not easily mistooken for anyone else. They play a ferocious brand of blackened sludge, easily among the very heaviest and most intense albums on this list. The guitar tones are abrasive and dissonant, the tremolo picking creating a persistent howl, over which the raging vocals pierce and stab at the listener.
Celeste are masters at gnawing at the listener with rapid-fire blast beats and those searing vocals, and then dropping the vocals and dialing back the drum tempo for instrumental stretches which are still wall-of-sound loud, but feel like absolute relief in comparison. The back-and-forth pattern of abuse and rest pretty much defines the structure of a typical Celeste album, this one included. It’s a challenging, exhausting listen, not something put on in the background. But the beatings are delightful.
Despite the relentless and punishing nature of the band’s sound, it’s the amount of melody that they work in that pushes their work into a special class. Woven through the blankets of sound are sneaky hooks that call out through the noise. This is very much in line with their lyrical content, which although generally lost on me due to being completely French (so much for high school language class), reviews and translated readings have revealed that their themes trend towards real-world themes of sorrow and abuse survival, with faint strands of hope that shine through the misery. Morte(s) Née(s) was a concept album about the kind of abuse women are subjected to in modern society, while Animale(s) was a “bleak story of a boy and a girl, a kind of love story with a tragic ending”, quoting the band’s Bandcamp page. Infidèle(s) does not seem to be a concept album like those two, but explores similar themes in a more individual manner.
This group has rocketed up onto my list of favorite bands, and this album should be on a lot more year-end lists than it is.
Progenie Terrestre Pura - oltreLuna
Deus Est Machina
Provided to YouTube by Catapult Reservatory, LLC
Deus Est Machina · Progenie Terrestre Pura
OltreLuna
℗ 2017 avantgarde music
Released on: 2017-05-31
Auto-generated by YouTube.
This is an incredible album, and I do not for the life of me understand why this album has not earned more attention. PTP blend progressive and industrial metal with atmospheric black metal flourishes. The mix is a unique sound of metal instrumentation interwoven with electronics that shape and color the sound, rather than existing as separate elements. The album deftly moves between brilliant sequences of progressive riffs, grindy blast-beat sections, calmed atmospheric lulls, and back again.
The atmospherics bring to mind some of the things Bear McCreary did on the Battlestar Galactica soundtrack, with flute, didgeridoo, female vocals, and hand drum sections building up to an explosion back into the main event.
One of the real stars here is the pristine production that is packed with detail. Maybe that’s why it hasn’t garnered more attention in a genre that seems to think sounding like you’re playing inside of a tin can is a virtue. Actually, it seems more likely that it’s just because the album is in Italian, and the English language coverage of it has been relatively limited.
Variabile inattesa,
con data di scadenza,
l'universo è l'uscita.
La grande luna mi guida
attraverso un ultimo viaggio
Un ultimo viaggio, oltreLuna
Dodecahedron - kwintessens
Dodecahedron - Hexahedron - Tilling The Human Soil (Official Premiere)
Taken from the forthcoming album "kwintessens". Release date: March 17th, 2017
Pre-order here: http://smarturl.it/SOMeshop
Follow Dodecahedron: https://www.facebook.com/ddchdrn/
Follow Season of Mist:
http://www.season-of-mist.com
http://www.facebook.com/seasonofmistofficial
http://www.youtube.com/user/SeasonOfMistLabel
https://www.instagram.com/seasonofmistofficial/
https://twitter.com/seasonofmist
The most mind-bending, brain-breaking album in a year full of challenging avant-garde metal. Kwintessens is a staggering, swirling, disorienting ride. The riffs come from every direction, angular and dissonant, simultaneously memorable and incomprehensible. For an album with so many twists and turns, it’s shocking just how cohesive it is. The dark, hazy sonic palette serves as the backbone from which the winding sonic excursions spring. This is truly one of the most meticulously crafted albums of the year, and it is completely captivating for its entire 41 minute runtime.
This is what will start the cure
Man’s wisdom, either through god’s revelation,
or through the service of the angels and the spirits,
or through the sharpness and the depth of understanding
Ufomammut - 8
UFOMAMMUT - Warsheep
PRE ORDER WARSHEEP 7" on https://www.supernaturalcat.com/store
FOR AMERICAN CUSTOMERS PLEASE PRE ORDER VIA NEUROT RECORDINGS https://neurotrecordings.merchtable.com
Prior to the album's release, the trio delight fans with an early extract from the record in the form of a video for the song "Warsheep"
The band describe their intentions of the video..."it is inspired by the lyrics of the song which in itself is a play on the words "Worship". The protagonist takes a symbolic journey from the natural human condition to the trappings of the dogmas of society, religion etc. The principle idea being that thought is blind and is caged into the illusion of being free." Adding to the video's eerie atmosphere, the setting is in an abandoned villa in Italy, and the surrounding woodland.
In a year where Electric Wizard came out and disappointed (scroll down), Ufomammut was there to step in with an especially fuzzy, filthy version of their psychedelic stoner doom. Whereas their last (brilliant) album, Ecate, leaned in a spacier direction, 8 comes down to earth and ratchets up the power an extra notch.
The album is deceptively complex. Fuzzy doom metal isn’t usually the home of tricky time signature changes, but Ufomammut takes their fuzzed-out guitar chugging and throws things off-kilter with some unexpected changes, adding an additional disorienting factor to the blanketing haze.
This is also perhaps Ufomammut’s best songwriting to date. As delightful as Ufomammut’s chugging has always been, and still is here, the melodies and compositions change up and take left turns a bit sooner than on previous efforts, avoiding staying locked into the same general patterns for as long as they might have in the past.
All the thoughts I have are wandering
All the things I see are so unreal
All I ever touch just disappear
All feelings are crumbling in my maze
Ingurgitating Oblivion - Vision Wallows in Symphonies of Light
Amid The Offal, Abide With Me
Provided to YouTube by Universal Music Group North America
Amid The Offal, Abide With Me · Ingurgitating Oblivion
Vision Wallows In Symphonies Of Light
℗ ℗ 2017 Willowtip Records
Released on: 2017-05-12
Producer: Florian Engelke
Producer: Adrian Bojarowski
Author, Composer: Florian Engelke
Author, Composer: Adrian Bojarowski
Auto-generated by YouTube.
That band name though. This was a great year for avant-garde death and black metal in the Gorguts and Deathspell Omega traditions. Ingurgitating Oblivion is very hard to describe, outside of saying that fans of Gorguts and similar bands must check it out. It’s heavy, atonal, and odd, but never gets lost in its own oddness. The rhythm section is just amazing - this is some of the most amazing drumming you’re gonna hear on a metal album all year. And woven throughout all of the brain-bending left turns and buildups are some surprisingly sticky melodies. I’d like to rave about the album, but I lack the words to describe it. At first glance, it’s simply another (great) angular technical death metal album, but it opens up so much as you dive deeper into it.
King Woman - Created in the Image of Suffering
KING WOMAN - "Deny" (Official Music Video)
KING WOMAN - "Deny" (Official Music Video)
From the new album 'Created in the Image of Suffering,' out now on CD/LP/Digital via Relapse Records.
Order Here: http://bit.ly/KingWoman
Subscribe to Relapse Records Channel: http://bit.ly/RelapseYouTube
Order on Bandcamp: https://kingwoman.bandcamp.com/
Order on iTunes: http://geni.us/KingWomaniT
Order on Amazon: http://geni.us/KingWomanAMZ
Order on Google Play: http://geni.us/KingWomanGP
Official Links:
King Woman on Facebook: https://www.facebook.com/KNGWMN/
King Woman on Twitter: https://twitter.com/kngwmn/
King Woman on Instagram: https://www.instagram.com/kngwmn/
King Woman on Bandcamp: https://www.kingwoman.bandcamp.com/
http://www.relapse.com
http://www.facebook.com/relapserecords
http://www.relapserecords.bandcamp.com
http://www.twitter.com/relapserecords
https://www.instagram.com/relapsereco...
Lyrics:
I know the spirit
Etiquette
I'd wash your feet with
My dirty hair
Jesus I love you
With all my heart
But I feel like an angel
I'm lacking the star
I'm lacking the spirit
I'm losing the heart
I'm lacking the spirit
I pray my mother
Won't you ever find a cure?
Throw back odd pill
Find euphoria I once knew
Am I so dulled down?
Am I a whitewashed wall?
So dirty on
The inside?
I know the spirit
Etiquette
I'd wash your feet with
My dirty hair
And you know I love you
With all my heart
But I feel like an angel
I'm lacking the star
I pray my mother
Won't you ever find a cure?
Throw back odd pill
Find euphoria I once knew
Am I so dulled down?
Am I a whitewashed wall?
So dirty on
The inside?
I pray my mother won't you ever find a cure?
Throw back odd pill find euphoria I once
Am I so dulled down?
Am I a whitewashed wall?
So dirty on
The inside?
Created in the Image of Suffering is vocalist Kristina Esfandiari’s takedown of her Coptic Christian cult-like upbringing. Far from a rebuke of religion in general, though, Esfandiari’s sights seem set on hypocritical practitioners, and trying to make sense of her treatment within that environment. The lyrics are deeply personal, and the vocals evoke the dulled pain of a survivor reflecting on their past trauma.
The instruments here largely create a thick haze, shoegazey take on doom. The riffs are occasionally powerful but rarely crushing, opting instead to paint an ethereal soundscape for Esfandiari’s vocals to call out from behind. The effect it creates is like the aural version of the desaturated “flashback” scenes in a movie - some of the details lost to time, but the gist of it still clear as day.
Also, unrelated to this album, but Esfandiari took stage with Thou earlier this year, and helped them kick off their set with a cover of Nirvana’s “Something in the Way”, and it just makes me wish for a whole album of Esfandiari singing Cobain’s most mumbley Nirvana songs.
I wish somebody would have told me
Cuz the past you can’t get back
Feels like somebody wore me
There’s a deliverance I lack
I can’t remember everything
You break the bread you drink the wine
You were a bad man
You break the bread you drink the wine
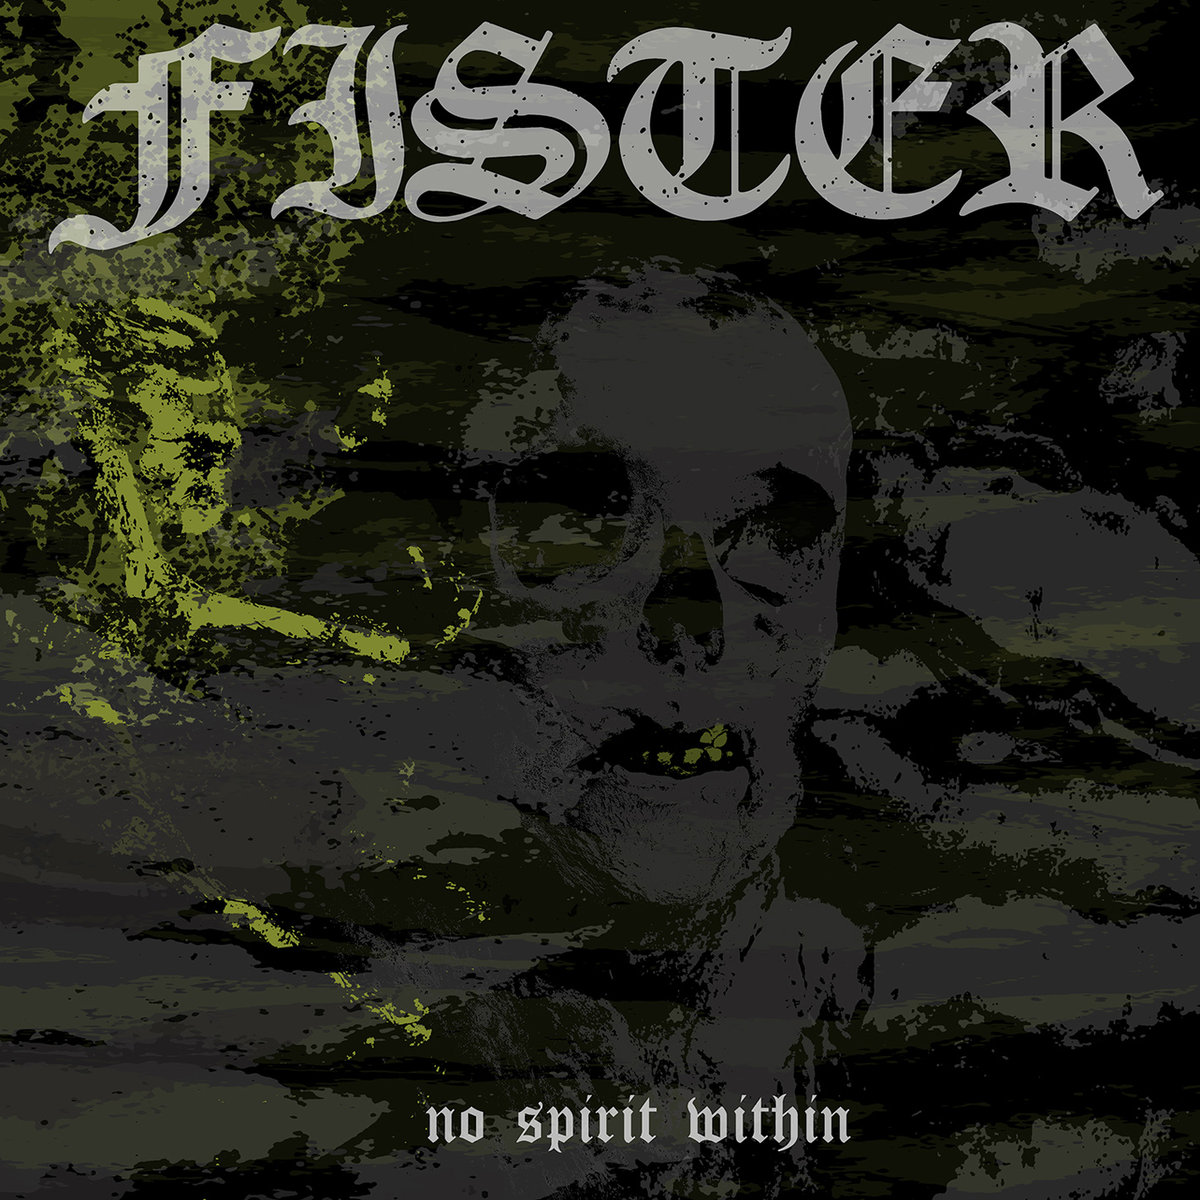
Fister / CHRCH - Split
Temples
Provided to YouTube by The Orchard Enterprises
Temples · CHRCH
Fister/CHRCH Split
℗ 2017 Crown and Throne Ltd. / Battleground
Released on: 2017-11-17
Auto-generated by YouTube.
CHRCH’s Unanswered Hymns was one of my absolute favorite albums of 2015. It was an immensely thick, sludgy take on doom, splashing around the same mucky pool as obvious influence Bell Witch. In lieu of a new album (make one already!), here we get a split with kindred spirits Fister, each group contributing a single 16+ minute track to the collaboration. CHRCH’s track feels like a direct continuation of the work on Unanswered Hymns: tension builds and releases between crushing wall of sound segments and quieter funeral passages, and vocalist Eva Rose’s tortured shrieks giving the whole thing an edge.
But whereas CHRCH exhibits a bit of artfulness that shines through the ugliness, Fister steps in and amplifies the bludgeoning with a howling, unforgiving dirge. Vocalist Kenny Snarzyk sets the tone here - whereas CHRCH’s Eva deploys her shrieks tactically, Snarzyk makes his the central bricks of the band’s wall of sound. The assault lasts the first 7 minutes of the 20 minute track, before a frenetic psychedelic section gives way to quiet, hypnotic guitar picking that eventually builds back up to a second Snarzyk vocal pummeling that closes out the track.
Chelsea Wolfe - Hiss Spun
Chelsea Wolfe - Spun (Official Video)
Chelsea Wolfe's "Spun" from the album "Hiss Spun" released September 22, 2017 on Sargent House.
Chelsea Wolfe on tour - http://chelseawolfe.net/shows
iTunes: http://smarturl.it/CWHissSpun_iTunes
Spotify: http://smarturl.it/CWHissSpun_Spotify
US CD/LP Store: https://www.hellomerch.com/collections/chelsea-wolfe
UK & EU CD/LP Store: http://sargenthouse.awesomedistro.com...
Bandcamp: http://chelseawolfe.bandcamp.com
http://chelseawolfe.net
http://facebook.com/cchelseawwolfe
http://twitter.com/cchelseawwolfe
http://instagram.com/cchelseawwolfe
http://sargenthouse.com/chelsea-wolfe
VIDEO CREDITS:
Directed by Chelsea Wolfe
Editing / light design: Ben Chisholm
Dancer: Felicia Drake // sedusastudio.com
Clothing: Jenni Hensler costume design, Micol Ragni (boots, coat)
DSTM Makeup: Kelly Carmichael
Hair: Sarah Scherer
Special thanks to Jessica Brown, Lance Jackman, Ella Cross, and On The Y for letting us fuck around in your limo!
Spun lyrics:
I LIFT MY EYES, I SLOW MY GAIT
AND I NEVER WANT TO SEE YOU AGAIN
YOU LEAVE ME RESTLESS, YOU LEAVE ME HUNG
YOU LEAVE ME COILED
YOU LEAVE ME SPUN
AWAKEN IN A TANGLE OF WIRE
I SLEPT DESPERATE, TRYING TO REACH YOU
YOU LEAVE ME RECKLESS, YOU LEAVE ME SICK
I DESTROY MYSELF AND THEN I WANT IT AGAIN
SPUN
HEAVY LOVE
COILED AND SPUN
A BRUTE, AN ANGEL, AND A MADWOMAN
A MOST ELEGANT IMPEDIMENT
WAS THERE FROM THE START
WAITING AND REPEATING WITHIN ME
WAITING AND REPEATING
MY PROBLEM IS THEIR DOWNTHROW AND UPHEAVAL
AND MY ENQUIRY IS AS TO THEIR WORKING
AND MY EFFORT IS THEIR SELF-EXPRESSION
BUT I WAS ONLY ROCK, DUST, WATER AND ICE
AND ANIMAL INSTINCTS ALL ALONG
THE HYPEROSMIA AND THE BASE SENSE
THE PRODROME AND THE AURA
THE SHADOWS AND THE SLEEP DEPRIVATION
THE TRICHOMES AND THE DELIRIANTS
CUT THROUGH THE FEAR CONDITIONING
TO FINALLY UNDERSTAND
IT WAS ALL AND EVERYTHING OR NOTHING
AND ALL AND EVERYTHING OR NOTHING..
//
Ben Chisholm: guitar, bass
Troy Van Leeuwen: lead guitar
Chelsea Wolfe: vocals
Jess Gowrie: drums
Chelsea Wolfe got on my radar with her previous album, Abyss, but nothing she’s done before holds a candle to Hiss Spun. Wolfe occupies a sonic area that straddles boundaries between doom metal, goth, industrial, shoegaze, and dream-pop, without ever staking a flag in any one’s territory. Her recent albums have moved the needle slightly more in the doom metal direction, coinciding with her finding a larger audience in that corner of the music world. That said, album opener “Spun” could go right onto My Bloody Valentine’s “Loveless”. The third track “Vex” is the one that grabbed me first, even before the guest vocals from Aaron Turner came in (and instantly made me wish for an entire collaboration album between the two).
At its core, the music is simple, uncomplicated. But it is so expertly crafted that simple things like a slight change in Wolfe’s vocal tone reverberates through the song. Most importantly, though it sounds like music that takes from a lot of identifiable influences, it doesn’t sound like music you’ve listened to before. It never fails to surprise.
Also, Chelsea has Neurosis’s Through Silver in Blood on her 5 favorite metal albums list.
As a bonus, here’s a mini-documentary produced by Revolver from Chelsea’s tour this year with opener Youth Code. (source)
no turning back
“only god knows what we’re headed for”
the flowers bloom
the sun rises
flux
hiss
welt
groan
Bereft - Lands
BEREFT - WE WEPT (official album track)
Order here: http://smarturl.it/BEREFT13
BEREFT weave elements of doom and black metal into exhaustive, dynamic songs, creating their own style of powerful metal, unbound to any genre and fully conscious of the impression.
Bereft brings forth the kind of grand, cavernous doom that you might expect from someone like Inter Arma, while sprinkling in some blast-beat black metal excursions to kick the tempo up and keep things from getting bogged down. Not that the album necessarily needs the high tempo changeups, as the spacious, exploratory doom is never really in danger of outstaying its welcome. But the changeups are welcome in that they are brilliantly executed and surprisingly seamless, and give Bereft their own unique fingerprint of the genre they inhabit.
Amenra - Mass VI
Amenra "Children Of The Eye" (official videoclip)
Amenra "Children Of The Eye"
Director: Wim Reygaert
DOP: Maximiliaan Dierickx
Sculptures: Isabelle De Vos
Art Direction: Najib De Brackenier
Styling: Isabelle De Vos
Edit: Wim Reygaert
Colour grading: Maximiliaan Dierickx
"Children of the eye"
MASS VI
Preorder now on
http://consouling.be/release/mass-vi
Lyrics:
no one ever will leave me behind.I cast no shadow. light is too profound.I am the way. All stars align. a new reign. uncrowned. with wounds adorned, we stand in line. river of blood leads to the shrine.hand in hand, side by side. we look our gods dead in the eye. shaved for burial. soul lost inside. anoint my skin, nothing to hide. I take the first step in the funeral pyre. a fire upon me. reside in me. I am the cold. the barren tree. reside in me.I am the fire no one can oversee. truth fire. not unto me. one tear at a time, you are a threat to mine. flood trenches. dredge remnants of my past. wash away my longing for me to be the last. come rain, wash us all away. here come the first wave, nothing will remain. forever more. no more. too cold to drown in. the deep. allowed in. no more.
Recorded and mixed by Billy Anderson
Mastered by Justin Weiss
www.ritualofra.com
www.facebook.com/churchofra
www.churchofra.com
This is the kind of album I would have been even more into when bands like Neurosis and ISIS were introducing me to the word of extreme metal - at least, if I were ready for the falsetto vocals at that time. Post-metal was my way in, and this album brings me back to those early discoveries.
As it is, it still is one of my favorites of the year, a deeply affecting album. It’s massive sounding, creating a thick atmosphere that I just want to wrap myself inside of. It builds and builds over the album’s 41 minutes, making it hard to listen to in chunks.
Whereas Primitive Man evokes a sense of neverending misery, Amenra brings forth a sense of looking into oblivion, into nothingness. It brings to mind prayers and rituals going unanswered, doubts about what is really waiting on the other side. The ending seconds of the album, in which the wall of sound sharply gives way to silence, is heart-dropping.
In terms of the basic elements, anyone that has listened to Amenra before, or even the post-metal bands that inspired them, won’t find anything shocking here. But it is an amazing execution of that subgenre, filtered through Amenra’s trademark spiritual bent.
with wounds adorned, we stand in line
river of blood leads to the shrine
hand in hand, side by side
we look our gods dead in the eye
Artificial Brain - Infrared Horizon
Artificial Brain - Absorbing Black Ignition [Official Video]
Artificial Brain - "Absorbing Black Ignition"
Sound
Produced by Colin Marston & Artificial Brain
Recorded and Engineered by Colin Marston at
Menegroth : The Thousand Caves, In Queens NY.
Video
Director - Tim Mearini
Additional Models - Nick Govacko
Links
profoundlorerecords.bandcamp.com/album/labyrinth-constellation
facebook.com/ArtificialBrainMusic
timmearini.com/
artstation.com/artist/crashmgn
Lyrics
Gemini – twin of two extremes
Symmetry – polarized at the seam
The side of dirt – an animal ignited
The side of the vacuum – existing in psychic
“Flesh is just mud, until tempered with fire
Heaving balance, a dimension of fibers”
Summoning energy, twins of darkness and light
Grey equation, charged with blackness beyond nights
“Soil, water, light – temples of the flesh which channel seas of urge.”
Gemini – twin of two extremes
Symmetry – polarized at the seam
“Flesh is just mud, until tempered with fire
Heaving balance, a dimension of fibers”
A sci-fi dystopian concept album. Thankfully, one that goes about it in a very different way than The Astonishing. Here, Artificial Brain’s avant-garde death metal evokes bleak landscapes littered with mechanical refuse. In an interview with Noisey, vocalist Will Smith states that he grew up as a huge fan of the Terminator movies, and that clearly informs the tone here. It’s a very direct album - whereas many of the other avant-garde albums on this list lean towards longer pieces, Infrared Horizon features briefer, snappier tracks which nevertheless maintain a very consistent tone throughout, creating a steady album flow. Still, the shorter song lengths make the end result different than an album of 10-20 minute tracks.
Bell Witch - Mirror Reaper
BELL WITCH - Mirror Reaper (excerpt / official audio)
Taken from the album "Mirror Reaper" out Oct 20, 2017
Pre-order "Mirror Reaper" here: www.profoundlorerecords.com/bellwitch
http://www.profoundlorerecords.com
http://www.facebook.com/profoundlorer...
twitter: @profound_lore
Instagram: https://www.instagram.com/profoundlor...
BELL WITCH on:
Facebook: https://www.facebook.com/BellWitchDoom/
Instagram: https://www.instagram.com/bellwitchdoom/
Twitter: @bellwitchdoom
BELL WITCH on tour this fall (w/Primitive Man):
10/25 - Denver CO @ Hi Dive
10/26 - Omaha, NE @ The Milk Run
10/27 - Chicago IL @ Cobra Lounge
10/28 - Rock Island IL @ Rock Island Brewery
10/29 - Hamtramck, MI @ The New Dodge
10/30 - Columbus, OH @ Ace Of Cups
10/31 - Pittsburgh ,PA @ Brillobox
11/01 - Toronto, ON @ Coalition
11/02 - Montreal, QC @ Bar Le Ritz
11/03 - Portland, ME @ Geno’s
11/04 - Oneonta, NY @ Cop Frat
11/05 - Boston, MA @ ONCE
11/06 - Brooklyn, NY @ Saint Vitus Bar
11/07 - Philadelphia, PA @Kung Fu Necktie
11/08 - Montclair, NJ @ Meat Locker
11/09 - Baltimore, MD @ Sidebar
11/10 - Richmond, VA @ Strange Matter
11/11 - Atlanta, GA @ Drunken Unicorn
11/12 - Nashville, TN @ Exit/In
11/13 - Little Rock, AR @ Whitewater
11/14 - Memphis, TN @ Growlers
11/15 - New Orleans, LA @ Santos
11/16 - Austin TX @ Lost Well
11/17 - Forth Worth TX @ Ridgelea Lounge
Bell Witch builds on their minimalistic sonic palette (bass, drums, vocals) and adds in - nope, still not guitar - a Hammond organ. Dylan Desmond’s 6-string bass work has to be heard. It doesn’t sink in at first that it’s not a guitar,
The 83-minute single track album is lengthy, but Bell Witch doesn’t go for “epic”. This is pensive, meditative, personal. It may drone but it rarely turns into an “atmospheric” piece. Rather, it remains firmly rooted in a very human sadness as it patiently descends deeper into its aural abyss. In a way, this is like the yin to Primitive Man’s yang.
dry the waves
anchor ice
mirror reaper
arrowed eyes
Pyrrhon - What Passes For Survival
Goat Mockery Ritual
Provided to YouTube by Universal Music Group International
Goat Mockery Ritual · Pyrrhon
What Passes For Survival
℗ ℗ 2017 Willowtip Records
Released on: 2017-08-11
Producer: Dylan DiLella
Producer: Erik Malave
Producer: Steve Schwegler
Producer: Doug Moore
Author, Composer: Dylan DiLella
Composer, Author: Erik Malave
Author, Composer: Steve Schwegler
Author, Composer: Doug Moore
Music Publisher: Doug Moore
Music Publisher: Dylan DiLella
Music Publisher: Erik Malave
Music Publisher: Steve Schwegler
Auto-generated by YouTube.
This was absolutely one of the hardest albums to absorb this year. Not that it the journey wasn’t enjoyable, because it was. But this dense, chaotic, angular assault comes from every direction, and changes its heading so frequently that it can be very difficult to get a foothold. It relly resembles a free jazz album being played by a death metal band. If the term “post-rock” was coined to mean non-rock music played using rock sounds and instruments, then it makes sense when people call Pyrrhon “post-death”, as this is a band taking death metal’s vocabulary, deconstructing it, and using it to make something very different from an old-school death metal album. That said, death metal isn’t the only subgenre being pulled from, as there’s clearly a good bit of grindcore and crust punk flowing into the maelstrom here too.
The production is a big part of what makes this album work. Lesser producing efforts could easily have reduced this into indeciperable mud. Instead, each instrument is clear and distinct, and are neither compressed into oblivion nor polished to a shimmer.
It takes quite a few spins to start to figure this one out, but it’s worth it.
He chants the happy victim’s creed:
“Let distraction succor me
and polish all my edges down
‘til I am smooth and blank as stone
to better fill my given role
Make me what I am
Make me the servant I was born to be""
Ex Eye - Ex Eye
EX EYE - "Xenolith; The Anvil" (Official Music Video)
EX EYE - "Xenolith; The Anvil" (Official Music Video)
'Ex Eye' is out now on CD/LP/Digital via Relapse Records
Order Here: http://bit.ly/Ex-Eye
Subscribe to Relapse Records Channel: http://bit.ly/RelapseYouTube
Directed by Derrick Belcham
Order on Bandcamp: https://exeyeband.bandcamp.com
Order on iTunes: http://geni.us/ExEyeiT
Order on Amazon: http://geni.us/ExEyeAMZ
Order on Google Play: http://geni.us/ExEyeGP
Official Links:
Ex Eye on Bandcamp: http://exeyeband.bandcamp.com
Ex Eye on Facebook: http://www.facebook.com/ExEye
http://www.relapse.com
http://www.facebook.com/relapserecords
http://www.relapserecords.bandcamp.com
http://www.twitter.com/relapserecords
https://www.instagram.com/relapserecords
Debut album from EX EYE, the instrumental, post-everything quartet led by renowned saxophonist Colin Stetson and featuring the otherworldly drumming of Greg Fox. EX EYE seamlessly weave between precise, clockwork intricacy and aggressive, ecstatic abandon while taking the listener on a cathartic, thrilling journey to total transcendence. Recorded live at EX EYE member Shahzad Ismaily's Figure 8 Studios in Brooklyn, NY (Blonde Redhead, Damien Rice, Okkervil River, Son Lux, Pussy Riot), the self-titled debut showcases a band that is without question the sum of its parts, as each player contributes not only their own particular technical prowess and expertise but also their signature compositional character. EX EYE make incredibly complex yet beautifully dramatic and emotive music which eclipses usual expectation of style or genre and is sure to be talked about for many years to come.
Saxophone in any non-jazz context has an incredibly high cheese factor potential. Good when you’re recording a solo for a Richard Marx single, less good in a “serious” album. In Colin Stetson’s hands, however, the saxophone becomes the backbone of an incredible instrumental avant-garde metal album.
The interplay between the baritone sax, guitar, electronics, and Greg Fox’s full body drumming has to be heard to be believed, and is so unique that it does not invite easy comparison. The album is simultaneously agile and impossibly dense. The band creates staggering walls of noise, but with a constant motion that propels the listener forward rather than consumes them. The album is just full of sudden sharp turns. After listening to dense screeches, the band will put its foot in the ground and instantly pivot, and suddenly you’re riding this steady groove and don’t even know when it happened.
It doesn’t sound like anything else in the genre. The CD and digital releases include a 12 minute bonus track which should not be missed (sorry vinyl buyers).
Dvne - Asheran
DVNE "Thirst"
Video by Louis Macera, Just-Aurèle Meissonnier and Paul Thomas.
Taken from DVNE's new album, Asheran. LP and Digital available for pre-order here:
https://songs-of-arrakis.bandcamp.com/album/asheran
Just when it seems like Elder are the clear owners of their niche, a band comes from out of left field to challenge that crown. Dvne (ie. “dune”, spelled in trve kvlt fashion to sidestep any legal entanglement over the name) come along with their debut full-length and, quite frankly, outshine Elder, even as Elder releases their arguably best work. Dvne brings the same progressive stoner metal sensibilities to the table, with equally nimble and frequent lead sequences dancing over the top. But Dvne’s style is such that it will take right turns into harsher, sludgier waters than Elder tends to, with death vocals popping in for accentuation here and there (though not enough that it should turn away anyone whose preferences don’t include harsh vocals).
There’s a lot of Dune-with-a-U inspired sci-fi in the lyrics (which form a concept album of sorts, though I’m not particularly inclined to try and unpack it all), but there’s none of that community-theater-in-music-form that a band like Dream Theater has sunken to. Instead, you can safely ignore any storyline and simply let the absurd number of killer riffs just wash over you for an hour.
For resolution, our time revolves in dark corners
Through exploration, our time revolves
The unseen path
For resolution
Loss - Horizonless
LOSS - All Grows On Tears (official audio)
Taken from the album "Horizonless" out May 19, 2017.
Pre-order "Horizonless" here: www.profoundlorerecords.com/horizonless
www.profoundlorerecords.com
www.facebook.com/profoundlorerecords
instagram: profoundlorerecords
twitter: @profound_lore
www.facebook.com/LossDoom
All Grows On Tears
When all the stones are thrown
Intentions revealed and secrets known
With wounds inflicted and regrets seeds sewn
Guilty roots deepen and left alone.
I’ve sunken to that place again
Where the sun only throws shadows
And the stars have all burned out…
Bury me in a lonely place
And plant thorns on my grave
I wonder as to what nourishment those roots must be suckling from that tomb?
I’ve sunken to that place again
Where the sun only throws shadows
In shame, bleeding
Bleeding... Cursed and left a failure
And the stars …the stars have all burned out…
When I leave the trees will shed gold
The winds will stand silent and the sun will go to sleep
Unease is important now…. chewing at me
What if the nightmares wont stop and I have nowhere to go?
We are only as sick as out secrets
So let the quiet put things where they're supposed to be
Depressing and heavy. Those are the only words that seem to fit Loss’s brand of funeral doom. Calling it funeral doom might be slightly misleading, as it sounds less like a funeral procession, and more like the inside of a depressed mind as they lay in bed: angered, saddened, lethargic, and too drained to move a muscle in response to any of it.
For such an album, Horizonless is surprisingly melodic. Guitar lines that you can easily imagine being played at a faster pace by an Iron Maiden-influenced band dote the otherwise desolate aural landscape. The vocal growls often go so low that they sound like they’re burrowing under the ground, but a collection of guest vocals also provide tonal contrast.
Junius - Eternal Rituals for the Accretion of Light
JUNIUS - CLEAN THE BEAST (Official Video)
Order here: http://smarturl.it/Junius17
Junius’ anthemic post punk/post metal reaches new levels with Eternal Rituals for the Accretion of Light featuring stunning packaging by Drew Speziale (Circle Takes The Square).
Limited edition LPs avilable here.
Prosthetic US Webshop – http://hyperurl.co/9kzq0f
European Webshop - http://hyperurl.co/r7f1bb
"Eternal Rituals for the Accretion of Light.... takes the band's alternately soaring and crashing sound to even more diverse places." - Rolling Stone
I love the absolute crap out of the first half of this album. I like the rest of it, but the first half has stuck with me since the first day I listened to it.
Junius is what we might call a metal band now, but in their previous two albums, they were much more of an art-rock group. This album sees the band embrace the heaviest of their material, make it even heavier, and crank up the goth while they’re at it, to establish a new alternative/goth/post-metal sound that was barely hinted at in their previous work.
The material here stands quite in contrast to most of the rest of this list. None of the tracks are particularly long, with only the last one breaking 6 minutes. Many of these songs would be perfectly at home on an alternative rock radio station. Artists like Tool and Katatonia would be the closest comparisons, both of whom I do like, so perhaps it should not be quite so surprising. Yet I was still blindsided by just how much this resonated with me. The Depeche Mode-like vocals over the thick post-metal guitar tones put to alternative metal song structures just works on every level.
my soul is worn
i’ve been here many times before
i need to breach this place
i’m bound to tempt the fates
i’m marching ‘till they know my name
Krallice - Loüm
Rank Mankind
Provided to YouTube by CDBaby
Rank Mankind · Krallice
Loüm
℗ 2017 Krallice
Released on: 2017-10-27
Auto-generated by YouTube.
The first of two albums Krallice released in the last quarter of the year. Loüm finds the group in collaboration with Dave Edwardson, bassist and (third) vocalist for Neurosis. Here he takes the lead on vocals, synths, and lyrics.
Like any Krallice album, there’s a ton to absorb here. The band departed from its atmospheric shoegaze-y black metal on 2015’s Ygg Hurr in favor of a more chaotic, kaleidoscopic style, which continued through 2016’s Prelapsarian and into this album. The wildcard on this one is Edwardson, whose presence tethers the sometimes aloof compositions and brings them back down to earth, then kicks them into gear with a hard driving hardcore sensibility - relatively speaking, of course, because this is still Krallice at some of their most technical and spastic.
The genius of Krallice is how they consumed subgenres into a unique style of their own. Ostensibly identified as a black metal band, based in large part to their early releases, the band has evolved the elements of black metal, and now increasingly death metal, into a sound that cannot in good conscience be labeled as either. Whereas the chaotic sounds of a band like Pyrrhon still exhibit strongly identifiable markers of death metal, Krallice’s dialect of these vocabularies have morphed into a language much less easily traced back to its origin. As lazy as a phrase like “Krallice sounds like Krallice” would be, it would also be accurate.
Little man is rank mankind
Common people’s worthless lives
Little man, you’re useless to me
I hate you, you have no value
Here to serve the likes of me
Businesses built on your backs and your toil
Fills the pockets of those with hands too good to touch the soil
Krallice - Go Be Forgotten
Go Be Forgotten
Provided to YouTube by CDBaby
Go Be Forgotten · Krallice
Go Be Forgotten
℗ 2017 Krallice
Released on: 2017-11-20
Auto-generated by YouTube.
If Loüm is Krallice continuing to distance themselves from the kind of atmospheric stylings that the band’s earlier work was known for, Go Be Forgotten is a reintroduction of those elements into their approach. Along the way, their Borg-like stylistic assimilation swings around to grab ‘70s space-prog and '80s synths this time, again morphing and reinventing those elements to make them conformant to the “Krallice” sound.
The chaotic, mind-bending attacks are still present here, but rather than dominating the album completely, they give way to atmospherics, and even a drum-less 7 ½ minute ambient space-rock piece 2/3rds of the way through the album.
This is probably the “easiest” Krallice album of the past few years, and should appeal to fans who were turned off by their hard pivot into more aggressive chaos since Ygg Hurr.
Yellow Eyes - Immersion Trench Reverie
Shrillness in the Heated Grass
Provided to YouTube by The Orchard Enterprises
Shrillness in the Heated Grass · Yellow Eyes
Immersion Trench Reverie
℗ 2017 Gilead Media
Released on: 2017-10-20
Auto-generated by YouTube.
I didn’t listen to this until I was almost done making this list, and it quickly wormed its way on. The two things that come to mind with this album are the use of field recordings, and the absolutely killer black metal riffs that bored their way directly into my core.
Field recordings have always been something I’ve found neat. I’ve been a fan of the Sublime Frequencies label for some time, especially their “Radio” series. I never thought I would hear field recordings featured in a black metal album, but here they’re used as interstitials to separate the different songs.
But what really defines this album for me is just how many of the angular guitar melodies stuck with me after only a few listens. There’s just so many great, memorable, dramatic parts, and the way the compositions bounce back and forth between melodic riffs and straight-up assaults, before giving way to the atmospheric parts layered with those field recordings at the end, is extremely enjoyable.
The day’s lung held full
shrillness in the heated grass
collapsing on his hunting stool
seed shells like a radiance
the oligarch flanks his tent
salted thistle in his throat
Immolation - Atonement
IMMOLATION - Fostering the Divide (OFFICIAL LYRIC VIDEO)
Official lyric video for "Fostering the Divide" from IMMOLATION on the upcoming "Atonement" album. Out now! Order at http://nuclearblast.com/immolation-atonement
SUBSCRIBE to Immolation YouTube: http://bit.ly/subs-immoltn-yt SUBSCRIBE to Nuclear Blast YouTube: http://bit.ly/subs-nb-yt
IMMOLATION "Atonement" is out now on Nuclear Blast Records
GET THE ALBUM 'ATONEMENT':
Nuclear Blast Records: http://nuclearblast.com/immolation-atonement
iTunes: http://nblast.de/ImmolationAtonementIT
Amazon: http://nblast.de/ImmolationAtonementAMP
GooglePlay: http://nblast.de/ImmolationAtonementGP
FOLLOW IMMOLATION:
Like: http://facebook.com/immolation
Follow: https://twitter.com/immolation
Watch: http://bit.ly/15Fzamk
There’s a number of non-tech, non-avant-garde death metal albums that I listened to this year that didn’t really stick with me (hi, Necrot!). But one that really did was Immolation’s Atonement. The songwriting here really stuck out to me from the first time I listened to the album. The songs here eschew some of the speed the group explored on recent albums, opting instead for more measured, mid-tempo pacings. It works, extremely well, as they’ve got an incredible collection of riffs, and give them the room to breathe and make their impact.
There’s nothing here that death metal hasn’t seen before. But at a time when a lot of old school death bands seem to be churning out sub-par material and still getting attention for it, Immolation is putting out some of the most expertly crafted work they’ve ever done. Call them the Tom Brady of death metal.
isolate us from one another
contempt for the unknown
hatred tears us apart
foster the great divide
u nsettling the masses,
igniting the flames of hate
Boris - Dear
Boris - Absolutego (Official Video)
Boris "Absolutego" from the album "Dear", available everywhere now.
Direction & Edit : Fangsanalsatan / Camera : foodunited. & Non
CD / LP Store: http://boris.hellomerch.com
iTunes: http://smarturl.it/BorisDear_iTunes
Full list of Tour Dates: https://sargenthouse.com/boris
BORIS
Website - http://borisheavyrocks.com
Facebook - http://www.facebook.com/borisheavyrocks
Twitter - http://twitter.com/Borisheavyrocks
Instagram - http://www.instagram.com/borisdronevil
Label site - http://sargenthouse.com/boris
Boris’s “Pink” anniversary tour, in which they performed that album in its entirety each night, reignited the group’s interest in the kind of sludgey doom/psych that has been at the heart of most of the group’s best releases, turning away from the more drone/ambient work that has comprised much of the band’s recent work. At the same time, they also incorporate their more “indie pop” songwriting that earned the band crossover attention starting with Pink and a number of following albums. The highlight as always is guitarist Wata, and the novelty of crushing waves of fuzz and distortion being produced by a tiny 4-foot-tall* Japanese woman is one that has never gotten old.
This is far and away the best Boris effort since, well, probably Pink.
(*: an exaggeration, but only very slightly. Seriously, I walked by her at the Psycho Las Vegas pool this year, and could not believe how short she really is)
Big‡Brave - Ardor
BIG|BRAVE - Sound OFFICIAL VIDEO
BIG|BRAVE's new album ARDOR out now from Southern Lord Records.
https://southernlord.com/
https://www.facebook.com/SLadmin/
https://twitter.com/TwatterLord
https://www.instagram.com/southernlordrecords
https://www.facebook.com/bigbravemusic/
http://www.bigbrave.ca/
Video by Mathieu Ball
Ardor is the second album from Montreal-based drone metal band Big‡Brave. Though they’ve toured with Sunn O))), their brand of drone metal isn’t nearly so domineering or impenetrable. Rather, they sound more like a Constellation Records artist (Godspeed You! Black Emperor, Silver Mt. Zion) than a typical drone metal act. Unsurprising, perhaps, given that that label is ground zero for Montreal-based instrumental-heavy indie bands.
The sound here is rather minimal and even somewhat inviting, as far as drone goes. Rather than endless drones creating a wall of noise, Big‡Brave uses a lot of space. Their musical phrases tend to incorporate pauses, both for allowing room to breathe as well as creating some off-kilter stop-and-start sequences. It makes for a very different take on “drone” than artists who hold an endless note for 20 minutes.
The trio’s drum and dual guitars (no bass) are joined by one of those Constellation artists, violinst Jessica Moss (Thee Silver Mt. Zion Memorial Orchestra). Moss’s violin sections, both soft and screeching, add a much-needed element to the group’s sonic mix. Robin Wattie’s yelping, piercing vocals, however, are the group’s defining element (and most polarizing). Bjork is the most immediate comparison for Wattie’s strained vocal timbre, and the tightrope they walk between emoting ecstacy and distress. For me, they are absolutely enchanting, as is the whole band’s work on this record.
and it’s not OK
and I do mind
calling you out
every single goddamn time
Best 2017 Albums That Actually Came Out in 2016
Zeal and Ardor - Devil is Fine
ZEAL & ARDOR - Devil is Fine (Official Video)
Website: http://www.zealandardor.com
Facebook: http://www.facebook.com/zealandardor
LP: http://www.smarturl.it/devilisfineLP
CD: http://www.smarturl.it/devilisfineCD
iTunes: http://apple.co/2lPFODp
Apple Music: http://apple.co/2ll8wfE
Spotify: http://spoti.fi/2lRnJW6
Director: Samuel Morris | http://www.samuelmorris.com
Director of Photography: Fabio Tozzo | http://www.fabiotozzo.com
Producer: Samuel Morris, Fabio Tozzo
Co-Producer: Fasnacht & Partner AG | http://www.fasnachtpartner.ch
Executive Producer: Radicalis Music GmbH under exclusive license to MVKA Music Ltd.
Performer: Reny Quizeidioco
Assistant Director: Christian Taro | http://www.taro.film
Gaffer: Oliver Muff
Make Up Artist: Angelina Belintani
Concept: Samuel Morris, Manuel Gagneux
Key Grip: Raoul Huber
Best Boy: Manuel Gagneux
Location Rigging: Christian Burgunder, Luca Schürch
3D Animation: http://www.ahoimotion.ch
Color Grading: Fabio Tozzo
© 2016 - All rights reserved
Self-released on Bandcamp way back in April 2016, this was picked up by label MVKA and put into print in early 2017, which is when I came into contact with it. This absolutely amazing project crosses slave spirituals with black metal and electronic experimentations. The result is a wholly unique sounding album that presents itself like twisted gospel sung on a plantation, except instead of praising Jesus, the songs carry more nefarious sensibilities.
This sort of genre crossing could have been horrible. It could have been so on-the-nose that it was just a charicature of its influences. Instead, it is so subtlely well done, and a large part of that comes from not being slavishly (sorry) faithful to the album’s core concept. If this was just a straight run of 9 spiritual-sounding black metal songs, it would not be nearly as effective. Instead, the definition of “black metal” used here is kept loose, and a third of the album are pieces that deconstruct the various elements and recombines them into tracks that resemble sound experiments more so than songs. These break up the album nicely, and make it more exciting when it swings back to the straightforward tracks.
I don’t have enough good words for this album. It is far and away one of the most amazing, effecting products of heavy music in 2017, even if it’s technically from 2016.
he gon' forgive my sins (devil is kind)
he promise many things (devil is fine)
i can’t do him no wrong (devil is kind)
i see him before long (devil is fine)
Labirinto - Gehenna
Labirinto - Mal Sacré [OFFICIAL VIDEO]
(if this video is blocked to you, access: https://youtu.be/-hg5xF5j6SE)
Track: Mal Sacré | Album: Gehenna (2016/2017)
* WORLD pre-order at Pelagic Records (2xLP, CD, digital) https://pelagic-records.com/product/labirinto-gehenna-2xlp-download/
* South America - www.dissensorecords.com
Roteiro e direção / directed by: AMNA
This is another album that was self-released in 2016, then picked up by a label in 2017. In this one’s case, it was The Ocean’s label Pelagic Records that re-released it for worldwide distribution in February.
It’s purely instrumental post-metal, not unlike a darker, more dramatic Russian Circles. The use of strings builds the atmosphere, with tracks like “Locrus” bringing to mind those early Godspeed You! Black Emperor,releases. Here, though, these pieces serve to break up the crunchy guitar assault that dominates the rest of the album.
This one is super under the radar. The group is Brazilian, and I’ve only seen a couple of English language reviews covering the album. Being entirely instrumental, there’s no language barrier to pierce in the music itself, but the fact that the band’s touring has been limited to their home country and a brief stint through central and eastern Europe (largely excluding the English-speaking countries) has done no favors to the group’s profile in America, the UK, or Scandinavia.
Which is too bad, because this should be the group’s breakthrough release. After having put out 8 other releases over their 11 year career (mostly splits and EPs, only one full-length), they went out and got famed sludge/doom producer Billy Anderson to fly out to their Sao Paolo based studio to record this one, and finally gained the attention of a label. Hopefully at some point they will tour some more and get their name out there.
Honorable Mentions
The Great Old Ones - EOD: A Tale of Dark Legacy
The Great Old Ones - The Ritual
Artist: The Great Old Ones / Album: EOD : A Tale Of Dark Legacy
Subscribe to Season Of Mist for new releases : https://som.lnk.to/YouTube
Season Of Mist online Shop : http://smarturl.it/SOMeshop
Website : http://www.season-of-mist.com/
Facebook : http://facebook.com/seasonofmistofficial
Twitter : http://twitter.com/seasonofmist
Soundcloud : https://soundcloud.com/season-of-mist
Independent in thought, sound and vision. Label of Saint Vitus, Atheist, Rotting Christ, Kylesa, Morbid Angel, Deströyer 666, Ghost Brigade, Cynic, Septicflesh, Mayhem, Solstafir and many more!
This one got onto my list early in the year, and just hung around. This album of atmospheric post-black metal revolves around HP Lovecraft’s mythology. The specifics are lost on me, as I have only the most casual of knowledge of Cthulhu, but the themes of an ancient elder god, sunken city, cultist worship, and a looming threat of return are simple enough to follow. The Great Old Ones endeavor to create the sense of scale and madness in musical form, and the really lay down that atmosphere fantastically. The intro to “The Ritual” is a perfect example, with droning guitar wails over church organ, evoking a twisted cultist ceremony within a dark, dilapidated church.
There are brief spoken-word segments which I could do without, but they’re brief. The rest of the time, we’re treated to great black metal riffing with some surprisingly active drumming. The biggest letdown is the overall production, which is more stifled and veiled than it should be. It’s not album killing, but giving the elements here some room to breathe would have made a difference.
Strange sculptures still stand
Ungodly forms in front of me
The remains of a cult which was banned
The cult of Dagon, lord of the sea
The Shadow over Innsmouth!
Elder - Reflections of a Floating World
Staving off Truth
Provided to YouTube by The Orchard Enterprises
Staving off Truth · Elder
Reflections of a Floating World
℗ 2017 Armageddon Shop
Released on: 2017-06-02
Auto-generated by YouTube.
Elder picks up where they left off with 2015’s Lore and further refine their spacey stoner/prog metal blend. As is their established style, Elder lays down a foundation of fuzzy guitar, and then layers a steady dose of nimble, melodic leads over the top, resulting in an album that is both extremely accessible as well as deeply fulfilling, with plenty of surprise and detail to feast on. Elder brings a greater sonic palette to the table this time around, with two guest musicians joining the trio in studio to add additional guitar and keys to the mix.
Running through the fields
Down the ones you think you need
Throwing off the chains, cursing years in vain
Living in a myth, the boundaries of which lie in decay
The body seeks to convalesce
The earth we deem it’s own redress
Altarage - Endinghent
Altarage - Spearheaderon (official music video)
Subscribe to Season Of Mist for new releases : https://som.lnk.to/YouTube
Taken from the forthcoming album "Endinghent". Release Date: Oct 13th, 2017. Order here: http://smarturl.it/AltarageEndinghent
Follow Altarage:
https://www.facebook.com/ALTARAGE/
Follow Season Of Mist:
http://www.season-of-mist.com
http://www.facebook.com/seasonofmistofficial
http://www.youtube.com/user/SeasonOfMistLabel
https://www.instagram.com/seasonofmistofficial/
Altarage hails from Spain and plays thick, noisy blackened death metal. Comparisons to Portal are often made, and are pretty accurate. The guitars create a mucky, compressed wall of noise, as they alternate between tremolo-picked freakouts and heavy death riffs. Vocals are growled from further back in the mix, usually just holding one or two words at a time, as these songs seem to have about 10 words in them on average.
The oppressive atmosphere is well established (with sickening, tar-like guitar tones), but much like the Immolation and Yellow Eyes albums listed above, this one earned an extra amount of time in my rotation thanks to a number of songs that stuck with me. The driving blast-beat sections give way to some excellent death metal riffing that crawls out of that tar and makes itself heard.
(As I’ve said, these are men of few words. The words below are the entirety of the lyrics to the 6-minute opening song, “Incessant Magma”. Pretty much every song is like this.)
Barrier down
Propheteer
Fundations of time
Magma
Surface
Deconstruct
Pillar Rust
Planning for Burial - Below the House
Planning For Burial - Dull Knife pt. I
Order: http://theflenser.bandcamp.com http://nowflensing.com
Artist: Planning For Burial
Track: Dull Knife Pt. 1
Release: Below the House
Label: The Flenser
Below the House is a doomgaze album that very much evokes the kind of snow-blanketed scenes depicted on the album’s cover. It alternates between shoegaze drone like Jesu (circa Conqueror), as well as the icy slowcore of a band like Low - but all coming from more of a doom metal-y perspective. Vocals alternate between blackened wails and shoegazey indie rock dude singing. The alternation between the harsher pieces and the slowcore keeps the noise from being overwhelming. Rather, it’s very much a melancholy affair.
It may be arguable just how “metal” this is, but on the whole, I’m going to keep it in the “doomgaze” category, which is metal enough to count.
This is the place I live
but it’s not my home
this is the place I live
my roots don’t grow
Luminous Vault - Charismata
Birthblood
Provided to YouTube by The Orchard Enterprises
Birthblood · Luminous Vault
Charismata
℗ 2017 Profound Lore
Released on: 2017-03-13
Auto-generated by YouTube.
This one slid under a lot of radars. A duo featuring modern classical composer Mario Diaz de Leon and the bassist from Artificial Brain, Samuel Smith, this EP is the group’s first “major” label debut (Profound Lore), having self-released another EP a couple of years ago. Not even sure how I stumbled on this other than it being on Profound Lore, as there are precious few reviews of it that come up in a Google search. On top of the Godflesh-inspired programmed drums belting out industrial thwak-s, de Leon and Smith grind out some great black and death metal riffs.
Usnea - Portals into Futility
USNEA - "Pyrrhic Victory" (Official Music Video)
'Portals Into Futility' Out Now on CD/2xLP/Digital
Order via Relapse Records Here: http://bit.ly/UsneaPIF
Subscribe to Relapse Records Channel: http://bit.ly/RelapseYouTube
Directed by Maximum Volume Silence
Live Video Credit: Billy Goate/Doomed & Stoned
Order on Bandcamp: http://usneadoom.bandcamp.com
Order on iTunes: http://geni.us/UsneaiT
Order on Amazon: http://geni.us/UsneaAMZ
Order on Google Play: http://geni.us/UsneaGP
Portland doom quartet USNEA return with their third full-length, Portals Into Futility. Inspired by dystopian science-fiction and the painful intersection of today's crushing reality, Portals Into Futility is 5 songs and 56 minutes of expertly crafted and elegantly depressive doom/sludge. With an evolved sound of strength and dynamism, USNEA delve more into the worlds of dissonant death metal, varied vocal structures and cinematic composition, all while maintaining the monumental heaviness, brutality, discord, anger, and mournful melodicism of their previous work. Across dark and brooding peaks and valleys, USNEA remind us that no matter how many doors are opened to the human species, our self-aggrandizement and hubris all lead to futility.
Official Links:
Usnea on Facebook: https://www.facebook.com/usneadoom
Usnea on Instagram: https://www.instagram.com/usneadoom/
http://www.relapse.com
http://www.facebook.com/relapserecords
http://www.relapserecords.bandcamp.com
http://www.twitter.com/relapserecords
https://www.instagram.com/relapserecords
Usnea is one of the many Portland-based doom metal bands to garner attention in recent years. I enjoyed their second album, 2014’s Random Cosmic Violence, as well as their live set at Psycho Las Vegas this year. On this album, the lyrics are inspired by (largely dystopian) sci-fi novels, of which the band provides a reading list: Gene Wolfe, Ursula Le Guin, Carl Sagan, Margaret Atwood, Philip K. Dick, and Frank Herbert. It’s a nice change in theme from the usual trappings of the genre.
The group’s sound has matured somewhat as well, as the group has embraced more death metal elements and varied vocal stylings, giving them a bit more range within which to work. The biggest downside is that it runs out of steam a bit in the final 20-minute long track. And despite a positive evolution of sound, it didn’t land quite as squarely for me as Random Cosmic Violence. That said, still a solid effort worth attention.
Impetuous Ritual - Blight Upon Martyred Sentience
Intransience
Provided to YouTube by The Orchard Enterprises
Intransience · Impetuous Ritual
Blight Upon Martyred Sentience
℗ 2017 Profound Lore
Released on: 2017-06-16
Auto-generated by YouTube.
This album begins with the creation of a aural whirling abyss by the guitars. It’s this all-encompassing rumble, sounding like what you might imagine a black hole to resemble - a fixed point in space of power and unfeeling consumption. It’s recognizable as guitar tones, but individual notes and chord strikes become imperceptibly blended together in this persistent, unflinching roar.
The first 7 and ¾ minute track is simply the establishment of this abyss, which essentially remains in place throughout the rest of the album, sitting there, whirling and roaring. Once the second track starts, the death metal kicks in, and these elements simply dance around the abyssal roar. Vocal growls and wailing guitar leads leap out to be heard, flashing for brief moments until falling into the abyss themselves.
Converge - The Dusk in Us
Converge - "A Single Tear"
Listen to the full album: http://bit.ly/2ypxqC7
"A Single Tear" by Converge from the album 'The Dusk In Us,' available now
Order at http://www.convergecult.com
Directed by Max Moore
http://www.maxmoorefilms.com/
Official Site: http://www.convergecult.com/
Facebook: https://www.facebook.com/converge
Twitter: https://twitter.com/Convergecult
Instagram: https://www.instagram.com/converge
I have such a conflicted opinion of Converge. There’s no question you’re listening to masterful musicians, but the metalcore style and, frankly, some of the lyrical expressions both veer into “misunderstood 17-year-old at Hot Topic” territory.
Converge albums deceptively hide their brilliant bits under the surface, so what is always an underwhelming listen at first exposes itself more over time. Kurt Ballou’s guitar work is glorious, as is his production of the album (and everything else he produces). Some of these songs really get under your skin and worm their way past your mental barriers, even when the words sound more like an angsty high schooler’s poetry. (The “cannibals!” scream will never not be cringey, though. The one part of the album that I simply cannot get past.)
They’re also one of those bands where your opinion of them changes (in a positive way) after watching them live. Seeing their live show shouldn’t make the albums sound any differently, but it does. Seeing them at Psycho Las Vegas definitely improved my listening of their previous album, All We Love We Left Behind, and since I am seeing them again in a couple weeks, I don’t doubt that my opinion of The Dusk in Us is going to get a bump.
As a single teardrop fell
And was swallowed by the sea
You outshined the best there was
Rewrote who I could be
When I held you for the first time
I knew I had to survive
Code Orange - Forever
Code Orange - The Mud [OFFICIAL VIDEO]
Code Orange's music video for "The Mud" from the album, Forever - available now on Roadrunner Records: http://codeorangetoth.com
Roadrunner Records Store: http://smarturl.it/codeorangestore
All In Merch: http://allinmerch.com/code-orange
iTunes: http://flyt.it/forever
Amazon: http://flyt.it/forever-amz
Google: http://flyt.it/forever-gp
Site: http://codeorangetoth.com
iTunes: http://flyt.it/forever
Facebook: https://facebook.com/codeorangetoth
Twitter: https://twitter.com/codeorangetoth
Instagram: http://instagram.com/codeorangetoth
Subscribe: https://bit.ly/2FkhYKA
Heavy Blog really teed off on this album in their annual Music Jouralism’s Top 25 list, calling it “one of the most overrated metal albums of the year”, and “nothing more than tough guy metalcore that barely strays into any truly experimental territory.”
I think that’s too harsh. The overrated bit might be true, based on just how high that rating is. They’re right that seemingly every publication has pegged this as one of the top albums of the year, and some have been absolutely effusive with their praise.
But as someone whose take on metalcore is such that I’m permanently stuck in the “bargaining” phase of even embracing a band like Converge (“they’re not really metalcore… right? … Right?”), this album did not strike me as “tough guy metalcore”, but a more varied album that wove in and out of different subgenres, and never seemed to settle into any one style. “The Mud” is a good example, as it moves between metalcore and alternative metal to start, then an ambient interlude acts as a bridge with a largely instrumental second half that firmly channels Meshuggah. The album pulls in different influences from song to song, and the rotation of vocalists between the different tracks ensures that the next song doesn’t sound like the one you just listened to.
Like with Converge, there’s some cringe to some of the lyrics here (“This is real now, motherfucker!” is the “cannibals!” of this record). Originality might not be the album’s strongest suit, as it unabashedly pulls from influences that all congregate in that late ‘90s/early '00s time frame. And it definitely is overrated by the mainstream metal press. But it’s good.
You wanna see it through my eyes?
You don’t
You can’t feel it from the inside
You had the chance. You won’t
Goya - Harvester of Bongloads
Misanthropy on High
Provided to YouTube by TuneCore
Misanthropy on High · Goya
Harvester of Bongloads
℗ 2017 Opoponax Records
Released on: 2017-03-03
Auto-generated by YouTube.
Goya’s subdomain for their URLs on both the merch site BigCartel and music selling site Bandcamp is simply “marijuana”. Stoner metal bands as a rule wear their love of reefer on their sleeve, and while Goya might not be among the many with “bong” in their name, they’ve finally worked it into an album title, and with a Metallica reference to boot. Goya has been prolific of late, and each new release has been an improvement to their formula. Bongloads keeps the pattern, easily being their new best. It’s thick, fuzzy stoner/doom that keeps a foot rooted strongly in psych rock.
misanthropy on high-a-day
no different from any other day
i sit and light the bong
i smoke this world away
i just sit here and waste away
Participation Ribbon
These are albums that aren’t necessarily on my “Best of” list, but that I wanted to talk about for some reason.
Power Trip - Nightmare Logic
POWER TRIP - "Executioner's Tax (Swing of The Axe)" (OFFICIAL VIDEO)
"Executioner's Tax (Swing of The Axe)" comes off the brand new Power Trip album "Nightmare Logic." With hooks and tightness rivaling greats like Pantera or Pentagram and production by the esteemed Arthur Rizk, "Nightmare Logic" punishes fans not only sonically but with pure songwriting skill. The sophomore release and second on Southern Lord Records, raises the bar and pushes Power Trip to new extremes.
"Executioner's Tax (Swing of The Axe)" (OFFICIAL VIDEO)
Director: Andy Capper
Director of Photography: Joel Pront
Editor: Andrew Betsch
Order "Nightmare Logic" Here:
http://southernlord.com/band/power-trip
http://southernlordeurope.com
http://powertripsl.bandcamp.com
https://itunes.apple.com/us/album/nightmare-logic/id1172529658
"Executioner's Tax (Swing of The Axe)"
Go on and look at you,
Today is your lucky day
The executioner’s here, and he’s ready to make you pay
You prayed for so long, and now you have your chance
The executioner’s here, and he’s sharpening his axe
Swing of the Axe
Cry all you want, but the blade soars today
Swing of the Axe
You buy in the for the privilege, to know what lies beyond
Death hides behind veiled faces
It only takes one swing, and you’re gone
The executioner,
The beginning and the end
He carries cold hard steel masked with the taste of medicine
Blessed with a reaper’s touch, his might cannot be matched
It’s time to pay the man, The Executioner’s Tax
Swing of the Axe
Swing at the World
Even a killer has to get paid
Swing of the Axe
OK, so I’m not the biggest thrash fan. But I enjoyed this album when it came out, and listened to it quite a bit. I had it penciled in for nothing less than an Honorable Mention all year.
But then, when I got around to finalizing the list, and listening to everything one last time… I found I just didn’t have a lot of desire to listen to this anymore. It was fun back in February, particularly as I was doing a lot of long drives up and down California for work, and it suited my mood for Highway 101 traffic.
But even having not listened to it for months, coming back to it, I found I remembered it all too well, as if I had listened to it all week long already. There wasn’t anything new to discover in revisiting it, just anthemic shouts that I felt like I was already tired of. I realize that’s basically criticizing the music for being exactly what it sets out to be, but I feel like I shouldn’t be this burnt out on it already.
That guitar tone is badass though. I can’t argue with that.
Last generation, an aberration
watching the whole world burn
we have no mouths and we must scream
the void welcomes us again
Pallbearer - Heartless
PALLBEARER - Thorns (OFFICIAL TRACK)
Track taken from the album 'Heartless'. Out march 24th.
SUBSCRIBE to Nuclear Blast YouTube: http://bit.ly/subs-nb-yt
»Heartless« is also now available for pre-order: http://nblast.de/PallbearerHeartlessNB
Pre-order »Heartless« digitally and receive 'Thorns' immediately or stream the song: http://nblast.de/PallbearerDigital
FOLLOW PALLBEARER:
http://pallbearerdoom.com/
https://www.facebook.com/pallbearerdoom
https://twitter.com/pallbearerdoom
https://www.instagram.com/pallbearerdoom/
Profound Lore:
https://www.facebook.com/profoundlorerecords/
http://profoundlorerecords.com/
twitter: @profound_lore
instagram: @profoundlorerecords
Copyright 2017 Profound Lore Records
One of my bigger disappointments of the year. Pallbearer had me with their last album, 2014’s Foundations of Burden. But this time around… it doesn’t connect.
There’s obviously some good things here. The vocals are the best they’ve done. The production is pleasingly well done. There’s some memorable guitar lines that stick with you. It’s not particularly crushing or heavy, but Pallbearer was never one to live on doom metal’s harder edges.
Most of the compositions just feel meandering, and lacking in both power and expressiveness. It’s clearly not as heavy as Foundations of Burden, pulling in more of a Pink Floyd influence. But it also doesn’t embrace that kind of Floydian take on space/prog-rock fully either, so what’s left is plodding doom-lite guitars driving songs that never get around to going anywhere interesting. It feels like an album stuck in transition. It’s never unpleasant to listen to, but it never leaves much impression either.
Ignoring signs
We believed that we were blameless
Then the harm could not be undone
We hang ourselves
From any rope put here to save us
And seal our fate
Together
To die as one
Mastodon - Emperor of Sand
Mastodon - Steambreather [Official Music Video]
New Album 'Emperor of Sand' available now:
Album Bundles – https://wbr.ec/eosbundles
Google - https://wbr.ec/eosg
Amazon - https://wbr.ec/eosamzn
Spotify - https://wbr.ec/eoss
Apple - https://wbr.ec/eosapple
iTunes - https://wbr.ec/eosi
Production Company: Blink Art
Executive Producers: Ben Honour, Helen Parker
Directors: Essy May & Stevie Gee
Producer: Hugo Donkin
Cast:
Metaller Small: Preston Nyman
Metaller Big: Chris Hayward
Master Don: Arnab Chanda
Hippy Woman: Ellie White
Frazzled Teacher: Mark Davison
Art Dealer: Emma Sidi
Helper Woman & Clown 1: Ruth Syratt
Helper Man & Clown 2: Mike May
Killer Clown, Bat & Death Hand: Stevie Gee
Crew:
1st AD: Ruaidhri Ryan
DOP: Ed Tucker
Focus Puller: Beau Scott
Camera Assistant: Cleo Vogler
Gaffers: Ben Skyrme & Max Halstead
Electricians: Chris Broomfield, Will Kay & Tina Georgieva
Production Design: Essy May, Stevie Gee
Art Director: Brin Frost
Art Dept: Brin Frost, Alannah Byrne, Stevie Gee, Isobel Irwin, Emma Sheehy,
Adeena Grubb
Casting: Charlie Perkins
Make Up: Roz Gomersall
Wardrobe: Brin Frost, Cha Cha Cha Vintage
Runners: Ben Tisdall, Lara Baxter
Post Production:
Visual Effects Director: Theo Nunn
Background Artist: Essy May
Editor: Jack Williams
Animation Directors: Stevie Gee & Essy May
2D Animator: Daniel Britt
Compositing: Theo Nunn, Jac Clinch, Joe Eckworth
Colour Grade: Smoke & Mirrors
Smoke & Mirrors Colourist: Jonny Tully
Smoke & Mirrors Producer: Andy Salem
Special Thanks:
St Mary at Finchley
Blinkink
Arri
Panalux
Connect with Mastodon:
http://mastodonrocks.com
http://facebook.com/mastodon
http://twitter.com/mastodonmusic
http://instagram.com/mastodonrocks
After two exceedingly underwhelming albums, I stopped expecting Mastodon to deliver anything that would interest me. However, after they released the single “Sultan’s Curse” alongside the announcement of the new album, I thought, “hmm…. maybe”. The song itself wasn’t spectacular, but did at least hint at some return to the style within which they had produced more interesting material.
Alas, it wasn’t to be. Far from a return to heavy and powerful, Emperor of Sand finds the band completing its migration into “crossover” territory, with limited success. Ironic for the band that as recently as 2014 was sniping at Dave Grohl for “making rock n roll safer”. Just three years later, Mastodon finds themself becoming what they claimed to dislike, because this album is filled with Foo Fighters-y dad-rock.
Surprisingly, the song on the album that I most care to listen to again is actually the most Foo Fighters-like of them all: “Show Yourself”. It’s very much “safe” rock and roll, and it was unquestionably recorded with an eye at sneaking into radio rotation (with some success, apparently, peaking at #16 on Billboard’s Rock Airplay chart, the band’s highest ranking single). But it’s extremely memorable and enjoyable, which is more than can be said of the material that follows it.
In the end, the album is disappointing in every aspect. It further confirms that the band that created albums like Leviathan is long gone, and even the band that created Crack the Skye seems to be beyond return. At the same time, they only really managed one track that succeeded in the more straightforward rock format that they’ve pivoted to. A collection of songs that lives up to “Show Yourself” would at least be a worthwhile dad-rock album. Sadly, we didn’t get that either. (I picked a song other than “Show Yourself” for the video above, as it’s more representative of how boring the album is.)
You’re not as safe as far as I can tell
And I can tell
Only you can save yourself
Soon this will all be a distant memory
Or could this dream
Be real at all?
Myrkur - Mareidt
MYRKUR - Ulvinde (Official Music Video)
'Mareridt' Out Now on CD/LP/DLX 2xLP/Digital
Order via Relapse Records Here: http://bit.ly/MyrkurMareridt
Subscribe to Relapse Records Channel: http://bit.ly/RelapseYouTube
Directed, Photographed, and Edited by Mats Ek.
Instagram: @matstxswe
Choir Girls:
Kari Kvittingen Djukastein, Amalie Hagesæter Gåsvær & Pernille Josefine Smit
Order on Bandcamp: http://myrkur.bandcamp.com
Order on iTunes: http://geni.us/MareridtiT
Order on Amazon: http://geni.us/MareridtAMZ
Order on Google Play: http://geni.us/MareridtGP
Mareridt (translation: Nightmare) is the highly anticipated sophomore full-length from renowned Danish composer and multi-instrumentalist MYRKUR. Recorded between Copenhagen and Seattle with producer Randall Dunn (Marissa Nadler, Earth, Sunn O))), Boris, Wolves In The Throne Room), Mareridt is a rich juxtaposition of the dark and the light; the moon and the mother earth; the witch and the saint. MYRKUR explores deeper into the mysterious and the feminine with 11 tracks that further progress her visionary blend of metal with gorgeous, stirring melodies, dark folk passages, choral arrangements and superb, horrific beauty. Further taking MYRKUR to new artistic heights are lyrics in multiple languages, an unforgettable collaboration with Chelsea Wolfe and an array of special instrumentation including violin, mandola, folk drums, nyckelharpa (an ancient Swedish key harp), and Kulning (an ancient Scandinavian herding call). Mareridt is a profound manifestation of nightmares that demonstrates MYRKUR as one of the truly exceptional artists of our time.
Official Links:
Myrkur Official Website: https://www.myrkurmusic.com/
Myrkur on Bandcamp: https://myrkur.bandcamp.com/
Myrkur on Facebook: http://www.facebook.com/myrkurmyrkur
Myrkur on Instagram: https://www.instagram.com/myrkurmyrkur/
http://www.relapse.com
http://www.facebook.com/relapserecords
http://www.relapserecords.bandcamp.com
http://www.twitter.com/relapserecords
https://www.instagram.com/relapserecords
The dislike (and sometimes outright hatred) of Myrkur among sections of the metal community is absurd. The oft-repeated claim that her work is “pop music posing as black metal”, and is “manufactured” for “album sales” is ridiculous enough to dismiss outright (black metal doesn’t exactly sell a lot of albums, and a “blonde girl” pop artist would make far more money selling, you know, pop records). And if that wasn’t enough, the numbers show that her album didn’t exactly sell like hotcakes, not that that’s going to satisfy the black metal truthers that are certain she’s making “poser” money.
That nonsense aside, I enjoyed her last album, and had high hopes for this one, but was let down. There are some good moments, particularly the track she shares with Chelsea Wolfe. Her vocals generally deliver, moving between screeches and breathy ethereal parts. But the sections where she channels Scandinavian folk music fail to make much impact, and the weakest material is right smack in the middle of the album (not counting a cringeworthy closing track that should just have been cut entirely). There’s about an EP worth of good material here, but the dispersion of it is such that the album stumbles and loses momentum as soon as it starts to go somewhere. Not bad, just not fully baked.
Am I adored?
Je suis votre amour
Am I a whore?
Cause you are the drug
Solitary are the things i know
In my garden they leave me alone
Sarin - Darker Lakes
Sarin - "Ocean Burn" - 07 (Darker Lakes, 2017)
Artist: Sarin
Song: "Ocean Burn"
Album: "Darker Lakes"
Buy "Darker Lakes" on 12" Vinyl: http://www.zegemabeachrecords.com/zegema-beach-releases/sarin-darker-lakes-12
--
Follow / visit Sarin on:
Bandcamp: sarin.bandcamp.com
Instagram: www.instagram.com/sarintheband
Facebook: www.facebook.com/sarinofficial
Bandsintown: www.bandsintown.com/en/a/142593-sarin
Spotify: open.spotify.com/artist/7g2mlkBV47PDCZ8wR7wKkJ
Unlike most of the other albums in the Participation Ribbon section, I actually like this one. I listened to it quite a bit. It isn’t a special record that I had to have in my top 40 or so albums, but it’s an underrated one that I wanted to call out.
It’s good, largely instrumental post-metal, with influences worn on their sleeve. But a couple of aspects stand out. First is the contrast between the dark guitar-driven compositions and some of the uplifting synth-driven parts. The second is the clean production. Between those two things, it was an easy listen, and one I often put on in the car this year when I wasn’t necessarily in the mood for absolute punishment.
It isn’t going to win awards and it probably won’t appear on many year-end lists, but it’s an underrated album, and one that listeners who like this sort of music but want something that goes down a little easier should check out.
I don’t know, I listened to this again, and maybe I should have bumped it up into Honorable Mentions.
Dreadnought - A Wake in Sacred Waves
Dreadnought Live Promo - Within Chanting Waters
Dreadnought at Hi-Dive Denver, CO 02/09/2017
"A Wake In Sacred Waves" 2x 180g LP/CD/Digital AVAILABLE NOW: https://dreadnoughtdenver.bandcamp.com/
https://www.facebook.com/dreadnoughtband
https://dreadnoughtdenver.com/
Video by Ben Fout: http://www.thebande.co
I feel like I should like this album. There are elements I like, and plenty of moments I like. The dual female vocalists, bringing both beautiful harmony and raspy black metal shrieks to the table, are winners. The folk elements, with flute and mandolin, contrast nicely with the progressive, doom-y metal. At any given moment, it sounds pretty great.
But actually sitting and listening to these four 10+ minute tracks is a bit unsatisfying. There’s a lack of direction, and those good moments seem to peter out and not take the songs anywhere. I mean, don’t get me wrong, I’ll listen to 60 minutes of atonal droning, but that’s not what Dreadnought is trying to be. The songs just sort of drift on, and I just end up drifting away while I’m listening.
I can see what people like, but it’s not getting me there.
(None of this album’s tracks are posted as YouTube videos that I could find, that video is as close as I could get.)
Asira - Efference
Asira - Crucible of Light
Crucible of Light is taken from Asira's debut album 'Efference'.
http://www.facebook.com/asirauk
http://www.asira.bandcamp.com
http://www.asira-band.com/
Sunrise, crucible of light
Oracular presence, enshrined
Golden dawn, blessed by Apollo’s rays
Solar beams intertwined
Now, claiming our eyes
Ablaze, baptise
None halt your rise
Dawn will claim my eyes
Radiant high
Ablaze, arise
Morning star
As its luminescence nears
A healing sphere
Darkness disappears
Helios severs the fading night
Aurora incandescent
Circadian flight
Searing, diurnal light
Dawn will claim my eyes
Radiant high
Ablaze, arise
Golden dawn will claim my eyes
Radiant high
Ablaze, arise
Morning star
This is a cool one, which just missed my Honorable Mention list, but I think deserves to be called out regardless because it’s a debut album of a band that is onto something.
Black metal is everywhere, and there are lots of bands playing “blackened” versions of other subgenres of metal. But nobody’s really doing blackened prog-metal, at least not doing it quite like Asira. When I say prog-metal, I’m talking metal that is influenced by Pink Floyd, King Crimson, and other ‘70s symphonic rock bands. If that reminds you a bit of metal-era Opeth, that’s an apt comparison, as Opeth certainly comes to mind more than a few times during this album.
But then there’s that “blackened” part, and that’s where Asira adds a wrinkle that sets them apart. Just listen to the embedded track (the whole thing) to get an idea. Add in some Floyd-ian ambient/atmospheric sections, and some Opeth-like pastoral metal bits, and you’ll have an idea what the album sounds like.
What keeps it off my best-of list is that the entire album doesn’t live up to the peaks of songs like the one above. The band is clearly still figuring out their identity. It’s still a good album, but I am hoping for an even better successor.
Electric Wizard - Wizard Bloody Wizard
Electric Wizard - See You In Hell
Electric Wizard "See You In Hell" a short film (Directed By Marek Steven ) Witchfinder Productions, Witchfinder Records/Spinefarm Records 2017
Music video by Electric Wizard performing See You In Hell. (C) 2017 Spinefarm Records, a Universal Music Company
http://vevo.ly/Qye4HB
Ugh, I had such hopes for this. The last two things Jus Oborn has touched were Cough’s latest album, Still They Pray (as producer), and Wizard’s own most recent album before this one, Time to Die. Both had what I love about Electric Wizard in abundance: impossibly thick fuzz, grimy stoned out riffs, vocal wails and warbles… the stuff that made the Wiz great.
Instead, we get this album, which feels more like a slightly underground ‘70s rock album. The album opener “See You in Hell” is the boring low point, but it doesn’t really get off the launch pad after that either. The Sabbath worship is apparent, as it always has been, but this is less being inspired by Sabbath, and more trying to play a clone of what Sabbath was playing in 1970, without any of the heaviness modern recording permits. Thing is, Sabbath absolutely would have had a bigger, heavier sound if they had the tools for it in 1970 - and what they may have lacked in recording punch, they made up for instead in the riffs themselves. Wizard Bloody Wizard’s riffs never come close to measuring up, leaving the whole thing as a hopelessly tepid affair.
Time to Die was underrated, in part because legal issues with their former drummer saw the album pulled from shelves and from streaming services a few months after release. This meant a lot of listeners who didn’t get in on it at release time missed out, and many did not go back to it after the album quietly became available again, over a year later. If that group includes you, do yourself a favor, and go listen to that instead. It’s got way more of what you want. Here, I’m going to embed a track here for comparison. You listen and decide.
Tchornobog - Tchornobog
TCHORNOBOG - Hallucinatory Black Breath of Possession (2017) Fallen Empire Rec. / I, Voidhanger Rec.
Direct links are provided to purchase 'Tchornobog' on digipak CD, vinyl, cassette, and digital format. Additional links are given for Tchornobog, Fallen Empire Records and I, Voidhanger Records.
"II: Hallucinatory Black Breath of Possession (Mountain-Eye Amalgamation)" is the second song on the album.
'Tchornobog' release date - July 21st, 2017.
Digipak CD (I, Voidhanger Records webshop)
http://i-voidhanger.com/product/tchornobog-tchornobog-cd-digipack
Digipak CD/digital format (I, Voidhanger Records, Bandcamp)
https://i-voidhangerrecords.bandcamp.com/album/tchornobog
Vinyl/cassette (Fallen Empire Records webstore)
http://store.fallenempirerecords.com/products?utf8=%E2%9C%93&search=Tchornobog&search-submit=
Cassette/digital format (Markov Soroka/Fallen Empire Records, Bandcamp)
https://markovsoroka.bandcamp.com/album/tchornobog
Tchornobog
Facebook - https://www.facebook.com/pg/Tchornobog
Instagram - https://www.instagram.com/tchornobog
Metal Archives - https://www.metal-archives.com/bands/Tchornobog/3540426943
Fallen Empire Records
Homepage - http://www.fallenempirerecords.com
Facebook - https://www.facebook.com/FallenEmpireRecords
I, Voidhanger Records
Homepage - http://i-voidhanger.com
Facebook - https://www.facebook.com/i.voidhanger.records
YouTube - https://www.youtube.com/user/lVoidhangerRecords
Promotional purposes sanctioned by Tchornobog, Fallen Empire Records and I, Voidhanger Records.
There’s a good album in here. I know there is. Other people can hear it. I can almost hear it.
But the reason I can’t hear it is the awful, awful production. To have an album this dynamic and record it like a shitty black metal band playing to a tape recorder in their garage is criminal. All I could do when listening to this was imagine what it should have sounded like.
Get this guy (it’s a one-man project) into a decent studio.